If you never used GitHub, and don’t know how to use this with Git, then this article is for you. GitHub is one of the most popular code hosting platforms to collaborate teamwork. Git helps us to monitor and work together with our team members in the same workspace.
Before going to start with GitHub, we need to understand that Git and GitHub are different things.
Git is a version control system that helps us to track the computer programs and the changes that were made over time. It allows us to work together and collaborate with our team on the changes or addition to the same repository. And GitHub is the web hosting platform that hosts a Git server program to store the code.
Read this blog to get more information about Git – Important Basic Git Commands – Developers should know.
In this article, we will learn and understand more about GitHub and how to use it. Let’s get started with GitHub:
1. What is Github?
![]() is a code hosting platform, built for collaboration. It let you work together with the team remotely from anywhere. It provides access control and several collaboration features such as bug tracking, feature requests, task management, continuous integration, etc.
is a code hosting platform, built for collaboration. It let you work together with the team remotely from anywhere. It provides access control and several collaboration features such as bug tracking, feature requests, task management, continuous integration, etc.
For example, if the developer team wants to make the application and everyone wants to contribute in the same workspace. So this platform helps to add the changes of code simultaneously and makes everyone contribute to the project from anywhere.
At the end of this article, we will get to know about repositories, branches, commit, pull requests, collaborations, review changes, etc.
2. Why it so popular?
- GitHub has many advantages over any cloud-based system or dropbox. It doesn’t create redundancy and confusion between the members. Github is a centralized repository where anyone can edit, add changes in the files.
- For example, let the team is working simultaneously on the project. If one of the team members is working on one file and he pushed the code changes in the repository, and at the same time, another team member is also working on the same file, and he doesn’t know about that changes.
- So if he pushed his code in the same file, then the previous work will be lost. And it will create a lot of problems for the team, and if we use Github, then this problem will be solved. It lets you know about the last commit changes, or if any conflicts, then it notified you.
- That’s why most organizations and developers are using Github. The other hosting platforms are, Gitlab, Bitbuckets.
3. Let’s Get Started
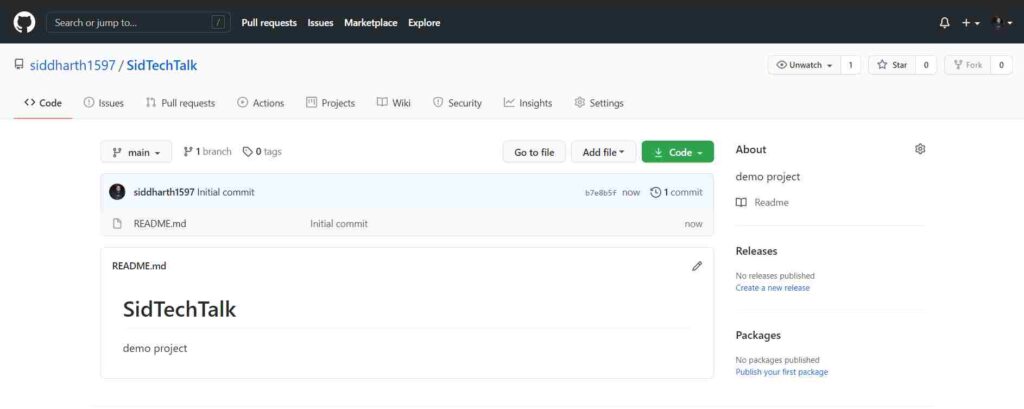
Step1. Create a Github Repository
A repository is a place where you can store the files, images, videos, directories, and data (anything that your project needs). The GitHub repository act as a remote repository. And the mirror copy of the remote repository in your local act as a local repository.
Let’s have a look at how the GitHub account looks after Signup. Go to the top-right menu option + sign to create a new repository.

- You can give your repository name and a brief description if you want.
- You can choose the privacy of the repository by selecting Public and Private. In public, anyone can see the repository, but it would allow committing only those peoples who have access. In private, no outside member can see the repository only accessed members can see and commit.
- Select Initialize this repository with a README.
Now, you have successfully created the new repository.
Step2. Create Branches
Branching helps to work on different versions of a repository at one time.
By default, the repository has one branch called main (sometimes master). It is your base branch of the repository. So, for example, if you want to add new features in the main branch, but you are afraid of committing to the main branch directly.
So, in that case, you need to create a new branch. It is a copy of the main branch. You can commit to the new branch, and if all looks good and you are ok with it then, you can merge it into the main branch.

To create a new branch from the main:
- Go to branches in the dropdown by default main branch is selected.
- So type the name of your branch (in my case, “new-branch“).
- Select the Create branch button.

Now you have two branches, so whenever you commit the features in the “new-branch”. You will see the difference between the branches by comparing them with the main branch.
Step3. Make Commit and Changes
This operation is needed when you save something. In the Git and Github systems, we can say commit. With this commit, there is one message you should provide that describes this commit. So, it will make other members understand the commit or changes that you have made.
Also, read about Git commit via the command line.
Okay, let’s have a look at commit changes through Github.
- Click on the Readme.md file
- Click the pencil icon in the upper right corner of the file view to edit.
- In the editor, add some changes to the file.
- Write a commit message that describes your changes.
- Click the Commit changes button.

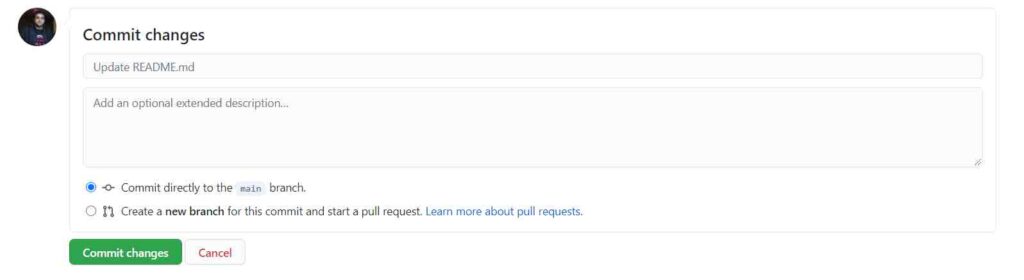
You have successfully done your first commit. Now you can compare the changes from the main branch. Let’s do the following process Pull request raise.
Step4. Raise Pull Request
Now, after committing the changes, you are ready to raise the pull request. This step is the important part of Github, where you can collaborate your work with the teammates and request the reviewers to review your commit changes and pull your changes and merge them into the main branch.
In the Pull requests window, you have seen the information available related to your commits like your file changes which you have done, the commit history of the branch, addition and subtraction of lines (difference between main and new-branch) in the code.
Let’s see the steps for the new pull request.
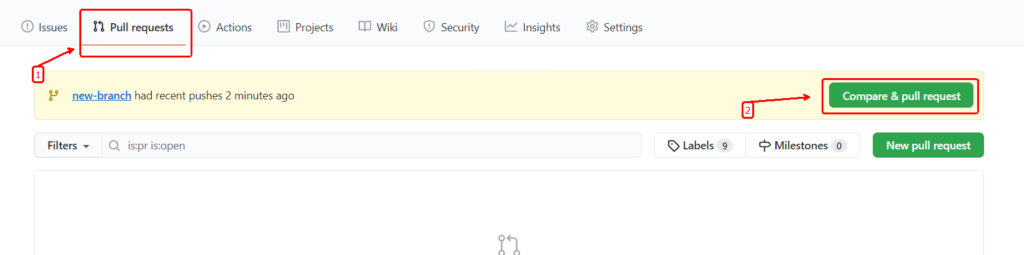
- Go to the Pull requests tab.
- Automatically a pop appears for raising the request against the recent commit. If not appears then, click on the “New pull request” button and select the branch.
Now the Pull request page appears like this:

- You can enter the title of the PR, write some description if you want more clarification.
- On the right side of the page, there are options for Reviewers, Assignees, Labels. For best practice, you should also fill up those things.
- You would add other persons from the team to review and approve your pull request and let them merge the request in the Reviewers section. In Assignees, you should add yourself in it if you raise the PR. In Labels, you can add the type of the pull request (let say Bugs, new feature, needs reviews, resolved).
Note: These above details are optional, but I recommend you to follow these as well for best practices.
When you are done with all of these, click Create pull request.
Step5. Merge Request
This is the final step to merging your changes in the man branch and becoming part of the contribution of the project.
- Click the green Merge pull request button to merge the changes into
main.

- Click Confirm merge.

- Go ahead and delete the branch, since its changes have been incorporated, with the Delete branch button in the purple box.

Finally, you have all things from creating the new repository to the merge changes. I hope you got the process of Github, you can also do these things from the command line through Git (version control system). Read this article.
4. Manage Access
This option is for privacy if you wanted to let other members contribute to the same repository. So, you have to invite the collaborators by going to the settings tab.

Invite the members and give them access to contribute to the project.
I hope you got the information about Github. By the way, if you wanted to show your contribution then go to your profile and see your contribution timeline in the green square boxes. You can also visit GitHub flow to understand the flow graph. We should use Git via commands to commit the features in GitHub.
Related Articles Important Basic Git Commands – Developers should know
Hope you like it👍 and if you find this useful then don’t forget to share this with your friends or on social media. And If you have any queries, please do ask in the comments section or anything that you want through mail then contact.
Thanks😊
Also, read


Nice tutorial sir…This is really good guide for beginners.
Thankyou